Wednesday, November 29, 2017

Storage Automation: A Great Adventure - Jack Out of the Matrix


Welcome back to our adventure in Storage Automation using APIs! This post will be focusing on taking the Output from our Python Script and throwing it out to Slack. I chose Slack because it is a good way of communicating to the whole team involved, but feel free to adjust the script to use whatever tool works best for your team.

Now... Lets find a way to escape the Rabbit Hole with our Report in tow!

Below is the script that I came up with by building off of the original which was created in my last  blog (Downloadable version of the script at my GitHub):

1:   #------------------------------------------------------------------------------  
2:   #Imports modules to be used within the script  
3:   #------------------------------------------------------------------------------  
4:   import json  
5:   import requests  
6:    
7:   #Allows the API Call to Authenticate with username/password  
8:   from requests.auth import HTTPBasicAuth  
9:    
10:  #Allows you to ignore the Security warning associated with unsecured certificates  
11:  from requests.packages.urllib3.exceptions import InsecureRequestWarning  
12:  requests.packages.urllib3.disable_warnings(InsecureRequestWarning)  
13:  #------------------------------------------------------------------------------  
14:    
15:  #------------------------------------------------------------------------------  
16:  #Build Variables to be used within the VMAX API Call  
17:  #------------------------------------------------------------------------------  
18:  username="<User ID>"  
19:  password="<Password>"  
20:  vmax_ip="<VMAX IP>"  
21:  vmax_sid="<VMAX SID>"  
22:  number = 0  
23:    
24:  #Calls for all Volumes which are true tdevs (customer facing)  
25:  #NOTE: Use the specific Univmax version API Calls that you have installed on the VMAX  
26:  #(Ex: I use '83' API Calls because we are running UniVMAX 8.3)  
27:  url = 'https://' + vmax_ip + ':8443/univmax/restapi/83/sloprovisioning/symmetrix/' + vmax_sid + '/volume?tdev=true'  
28:    
29:  #Initialize WebHook URL to Post to Slack (The Key is given when setting up the WebHook Integration in Slack)  
30:  webhook_url = 'https://hooks.slack.com/services/XXXXXXXXX/YYYYYYYYY/ZZZZZZZZZZZZZZZZZZZZZZZZ'  
31:    
32:  headers = {'content-type': 'application/json', 'accept': 'application/json'}  
33:  verifySSL=False  
34:  #------------------------------------------------------------------------------  
35:    
36:  #------------------------------------------------------------------------------  
37:  #Build the Session to make the API call to the VMAX  
38:  #------------------------------------------------------------------------------  
39:  session = requests.session()  
40:  session.headers = headers  
41:  session.auth = HTTPBasicAuth(username, password)  
42:  session.verify = verifySSL  
43:  #------------------------------------------------------------------------------  
44:    
45:  #------------------------------------------------------------------------------  
46:  #Make a GET request to the VMAX for a list of LUNs/TDEVs  
47:  #------------------------------------------------------------------------------  
48:  lun_id_get = session.request('GET', url=url, timeout=60).json()  
49:  lun_list = lun_id_get.get('resultList')  
50:    
51:  #Send Complete Message to Slack  
52:  slack_message = "----------------------------------------------------- \n " \  
53:                  "Getting Started! \n" \  
54:                  "-----------------------------------------------------"  
55:    
56:  #Loop thru each of the LUNs and pull the relevant data for reporting purposes  
57:  for i in lun_list.get('result'):  
58:    lun_id=i.get('volumeId')  
59:    print ('-----------------------------------------------------------------')  
60:    print ('Volume ID: ' + lun_id)  
61:    print ('-----------------------------------------------------------------')  
62:    
63:    # Grab each LUNs relevant data for reporting purposes  
64:    url = 'https://' + vmax_ip + ':8443/univmax/restapi/83/sloprovisioning/symmetrix/' + vmax_sid + '/volume/' + lun_id  
65:    response = session.request('GET', url=url, timeout=60)  
66:    data = response.json()  
67:    lun_name = data['volume'][0]['volume_identifier']  
68:    lun_cap = data['volume'][0]['cap_gb']  
69:    lun_used_pct = data['volume'][0]['allocated_percent']  
70:    lun_used_cap = (lun_cap * lun_used_pct) / 100  
71:    print('LUN Name: ' + lun_name)  
72:    print('LUN Capacity: ' + str(lun_cap))  
73:    print('LUN % Used: ' + str(lun_used_pct))  
74:    print('LUN Used Capacity: ' + str(lun_used_cap))  
75:    print('-----------------------------------------------------------------')  
76:    print('')  
77:    
78:    #Only report on LUNs that are over 50% Full  
79:    if lun_used_pct >= 50:  
80:      #Setup WebHook Variables to make the call and post results to Slack Channel  
81:      slack_message = slack_message + "\n" \  
82:                      "######################\n" \  
83:                      "LUN Name: " + lun_name + "\n" \  
84:                      "LUN Capacity: " + str(lun_cap) + "\n" \  
85:                      "LUN % Used: " + str(lun_used_pct) + "\n" \  
86:                      "LUN Used Capacity: " + str(lun_used_cap) + "\n" \  
87:                      "######################\n"  
88:    
89:    #Keep Track of Number of LUNs processed  
90:    number += 1  
91:  #------------------------------------------------------------------------------  
92:    
93:  #Add Complete Message to Slack  
94:  slack_message = slack_message + "\nAll is done and Looks good! :thumbsup: \n " \  
95:                  "-----------------------------------------------------"  
96:    
97:  #------------------------------------------------------------------------------  
98:  #Make the Call to Post results to the SlackOps Slack Channel  
99:  #------------------------------------------------------------------------------  
100:  slack_data = {'text': slack_message}  
101:    
102:  response = requests.post(  
103:    webhook_url, data=json.dumps(slack_data),  
104:    headers={'Content-Type': 'application/json'}  
105:  )  
106:    
107:  if response.status_code != 200:  
108:    raise ValueError(  
109:      'Request to slack returned an error %s, the response is:\n%s'  
110:      % (response.status_code, response.text)  
111:    )  
112:  #------------------------------------------------------------------------------  


As you walk through the script, you will see the backbone is still the same as the previous version with added logic to send the created report to Slack.


  • Adjusted the Script to only report on LUNs that are over 50% Utilized (So as not to spam the team too much)
  • Added webhook logic to send a built message out to a Slack Community Channel
  • Added an Error Catch at the end of the Slack WebHook Call just in case

What's up Next?


    This is the end of the road for this Mini Blog Series on VMAX Storage Automation using Python and API Calls!
    We were able to escape The Matrix with a nice report in Slack in hand and ready for our team!
    I will be working on another Mini Series for the EMC XIO Gen2 in the near future following these same basic principles, so stay tuned!


    Previous Blogs in the Series


      Tools Used in the Making of this Episode


        • PyCharm: Python IDE that seems to have favor of the community
        • PyU4V Project: GUI for building API Calls to the VMAX

        Special Thanks


        • devStepsiz: For helping me figure out how to post a JSON Payload to Slack

        Thursday, October 26, 2017

        Storage Automation: A Great Adventure - Entering the Matrix


        Welcome back to our adventure in Storage Automation using APIs! This post will be focusing on getting the Python Script in place so we can eventually build out some nice reports.

        Since you were willing to take the Red Pill and weren't scared off by the after math, Let's keep digging in!

        Below is the script that I came up with by building off of the original which was created in my last step of the process (Downloadable version of the script at my GitHub):

        1:  #------------------------------------------------------------------------------  
        2:  #Imports modules to be used within the script  
        3:  #------------------------------------------------------------------------------  
        4:  #Allows API Calls to be made to the VMAX  
        5:  import requests  
        6:    
        7:  #Allows the API Call to Authenticate with username/password  
        8:  from requests.auth import HTTPBasicAuth  
        9:    
        10:  #Allows you to ignore the Security warning associated with unsecured certificates  
        11:  from requests.packages.urllib3.exceptions import InsecureRequestWarning  
        12:  requests.packages.urllib3.disable_warnings(InsecureRequestWarning)  
        13:  #------------------------------------------------------------------------------  
        14:    
        15:  #------------------------------------------------------------------------------  
        16:  #Build Variables to be used within the API Call  
        17:  #------------------------------------------------------------------------------  
        18:  username="<User ID>"  
        19:  password="<Password>"  
        20:    
        21:  #Calls for all Volumes which are true tdevs (customer facing)  
        22:  #NOTE: Use the specific Univmax version API Calls that you have installed on the VMAX  
        23:  #(Ex: I use '83' API Calls because we are running UniVMAX 8.3)  
        24:  url = 'https://<VMAX IP>:8443/univmax/restapi/83/sloprovisioning/symmetrix/<VMAX SID>/volume?tdev=true'  
        25:    
        26:  headers = {'content-type': 'application/json',  
        27:        'accept': 'application/json'}  
        28:  verifySSL=False  
        29:  #------------------------------------------------------------------------------  
        30:    
        31:  #------------------------------------------------------------------------------  
        32:  #Build the Session to make the API call to the VMAX  
        33:  #------------------------------------------------------------------------------  
        34:  session = requests.session()  
        35:  session.headers = headers  
        36:  session.auth = HTTPBasicAuth(username, password)  
        37:  session.verify = verifySSL  
        38:  #------------------------------------------------------------------------------  
        39:    
        40:  #------------------------------------------------------------------------------  
        41:  #Make a GET request to the VMAX for a list of LUNs/TDEVs  
        42:  #------------------------------------------------------------------------------  
        43:  lun_id_get = session.request('GET', url=url, timeout=60).json()  
        44:  lun_list = lun_id_get.get('resultList')  
        45:    
        46:  #Loop thru each of the LUNs and pull the relevant data for reporting purposes  
        47:  for i in lun_list.get('result'):  
        48:    lun_id=i.get('volumeId')  
        49:    print ('-----------------------------------------------------------------')  
        50:    print ('Volume ID: ' + lun_id)  
        51:    print ('-----------------------------------------------------------------')  
        52:    
        53:    # Grab each LUNs relevant data for reporting purposes  
        54:    url = 'https://<VMAX IP>:8443/univmax/restapi/83/sloprovisioning/symmetrix/<VMAX SID>/volume/' + lun_id  
        55:    response = session.request('GET', url=url, timeout=60)  
        56:    data = response.json()  
        57:    lun_name = data['volume'][0]['volume_identifier']  
        58:    lun_cap = data['volume'][0]['cap_gb']  
        59:    lun_used = data['volume'][0]['allocated_percent']  
        60:    print('LUN Name: ' + lun_name)  
        61:    print('LUN Capacity: ' + str(lun_cap))  
        62:    print('LUN Used: ' + str(lun_used))  
        63:    print('-----------------------------------------------------------------')  
        64:    print('')  
        65:  #------------------------------------------------------------------------------  


        As you walk through the script, you will see the backbone is still the same as the previous version but with a bit of a twist.


        • Adjusted my URL call to use the specific version of UniVMAX (8.3) as to match up exactly what the array is expected to see. 
        • Added the "tdev=true" filter to the API URL to only return the LUNs that I need to see, and not the backend LUNs behind the scenes.
        • I added a Loop, which allows us to take the list of LUNs/TDEVs returned from the array and pull specific data we would like to report on.
          • Volume Name
          • Volume Max Capacity
          • Volume Allocated Percent
          • etc...

        What's up Next?


          Now that we have the desired data that we can play with, our next step is to take that data and create a nice and pretty report to show off to your co-workers and friends. I'm hoping to tie a report into Slack and post it within a Slack Channel.


          Previous Blogs in the Series


            Tools Used in the Making of this Episode


              • PyCharm: Python IDE that seems to have favor of the community
              • PyU4V Project: GUI for building API Calls to the VMAX

              Special Thanks


              • Paul Martin (@rawstorage) for helping to continue down this rabbit hole

              Wednesday, September 13, 2017

              Storage Automation: A Great Adventure - Red Pill

              Image result for matrix take the blue pill picture

              Welcome back to our adventure down the Storage Automation (Notice I didn't use DevOps, I've noticed that the term has gotten some negative vibes as of late) using APIs! This post is going to highlight my "Major" breakthrough on an API call to the VMAX.
              Now that you've decided to take the Red Pill and see how far the rabbit hole goes, Let's dive in!

              I started my quest with the help of the the Unisphere for VMAX REST Client, which is a GUI that allows you to browse and experiment with the API calls available for the VMAX. Below is a screenshot of the API call that we will be diving into today (I know it's an extremely basic API call, but we have to start somewhere).


              My next hurdle to clear was to figure out how to make this same call within Python and fortunately, along came Paul Martin (@rawstorage) to introduce me to the PyU4V Project, where some genius engineers at EMC took the initiative to help the community out and put in some tremendous leg work in making this leap into the VMAX API world much less daunting.

              At this point, now that I had PyU4V setup, configured, & running, I wanted to take a step back and learn (at it's base) what was truly happening behind the scenes. I like to take a look under the hood and learn how something works before I just jump whole heartedly into using it because it gives me a better perspective and base to work with later down the road.
              I tore apart the modules within PyU4V and with a bit of cohersing, I was able to come up with a way to make the call outside the tool and pull back the results I was wanting in a JSON format. Below is that simple Python Script/Call to accomplish the same thing we did with the RESTClient from above (GitHub Project).


              This may not seem like much at the moment, but we will be taking this building block and working on creating a reporting tool which will give us much more visibility into the array, and even further down that road, maybe even taking some automated action against the array based on the input from the API call.

              Thanks for sticking with me for another episode of this adventure. Let's continue to see where this takes us!

              Whats up Next?


                Now that we have a simple API call to build upon, I plan to work down the route of fleshing out the Python Script to pull in all LUNs Storage Capacity & Allocated Percent and format it in a usable fashion. This will set us up for our next step of integrating it it into a monitoring tool for visualization.

                Tools Used in the Making of this Episode


                  • PyCharm: Python IDE that seems to have favor of the community
                  • PyU4V Project: GUI for building API Calls to the VMAX


                  Special Thanks


                  Thursday, August 31, 2017

                  Storage DevOps: A Great Adventure - The Prelude

                  Related image

                  I recently came to the realization that I just CAN'T do it all. 
                  The past year I have been trying to:
                  • Get Field Specific Certs
                    • EMC Storage
                    • VMWare DCV & NSX
                  • Learn Everything I can about Storage (EMC Specifically)
                  • Learn all I can about Python, Perl, & several other programming languages popular in the DevOps world
                  • Learn ALL I can pertaining to the DevOps way of life and the mentality behind it


                  This, in turn, has left me run ragged after a year of constant 100% balls to the wall action. Due to this I had to pull away for a week or so and lay everything out on the table to re-priortize & focus my goals to be a bit more realistic and reachable (It's all about those baby steps).

                  I've done some initial research and digging into what DevOps truly is and what impact it has within Storage. 
                  Below is what, in my opinion & Point of View, I have unearthed:
                  • Definition: Automating Tasks for a layer of hardware that would otherwise be an arduous task manually, which more than likely will also result in inconsistent results
                  • 3 Steps/Layers
                    • Monitor/Reporting (This is where I sit today): Using APIs/CLI to pull information out of the system and formatting that data into a usable report
                      • This is the least intrusive place to start your journey into the DevOps world
                    • Move/Add/Change: Using APIs/CLI to create or adjust config within the layer of hardware
                      • This is your 2nd step in this crazy world because it is a little more intrusive in nature and means you need some experience and insight before implementing
                    • Full Automation
                      • This is the Big Daddy of them all because you are giving the hardware full reign to roll with the punches and even self heal

                  As I mentioned in the list above, I have done some work within the Monitor/Reporting Layer for the last 6-8 Months. My Co-Worker and I have built a Suite of Modules that gives us some crucial insight & even predict (Yes! We have a Crystal Ball) into all of our Storage arrays across the enterprise. This work has saved our ass multiple times and has been well worth our investment in time and effort. That being said, at its' base we are using basic CLI commands to poll the arrays and there is nothing wrong with that but my goal here is to build on that foundation and move into the API side of things.

                  Moving forward, I plan to focus on the more trending side of the Storage world and that is pretty obviously the Monitoring, Reporting, Move/Add/Change, & ultimately the Full Automation of Storage thru APIs (as the hook into the arrays) & Python (as the programming language to make it all happen).

                  Please Join me in my adventure down the Storage DevOps Rabbit Hole and let's see what we can create.


                  Special Thanks


                  • Ryan Booth (@that1guy15) for helping mentor me and push me in the right direction
                  • TheNetworkCollective for your PodCast on Network Automation (Inspiration)
                  • Paul Martin (@rawstorage) for your in depth conversation on VMAX APIs thru Python
                  • Bowie Poag for ushering me into & opening my eyes to the possibilities in Monitoring/Reporting of Storage

                  Tuesday, June 27, 2017

                  Windows Backup (BKF) File Restore on Windows 10

                  Task at Hand


                  Restore Files/Directories from a Windows Backup (.bkf) on Windows 10

                  Personal Blurb


                  I recently had a Windows 2003 Server running on almost 10 year old hardware finally took a dive to the point of no return. Due to this I had to learn how to crack into a .bkf file and restore some files, but that apparently isn't as easy as you might think from a Windows 10 PC. So below is my findings on how to go about doing this.

                  Let's get to Work!


                  1. Download nt5backup.cab
                  2. Unzip the CAB File with 7-Zip (Or a similar Unzip Application)
                  3. Go to ./nt5backup/files & Double Click on ntbackup.exe
                  4. Validate the “Always start in wizard mode” Checkbox is selected & Click Next
                  5. Select “Restore files and settings” & Click Next
                  6. Hit the Browse Button and Browse to the Server’s .bkf File

                  7. Select the File/Files/Directory that is being requested to be restored & Click Next
                  8. Hit the Advanced Button
                  9. Select “Alternate location” in the Restore files to: Dropdown box & Browse to the New Location to drop the restored files into.
                  10. Click Next & Select Leave existing files (Recommended)
                  11. Click Next Leave Restore security settings & Preserve existing volume points Checkboxes & Click Next
                  12. Click Finish & Watch it Roll

                  Monday, June 26, 2017

                  UniFi: Purchase & Setup Guide


                  Task at Hand


                  Guide anyone interested in the UniFi Network Stack for home or business based on my experience with the whole process

                  Personal Blurb


                  I have had an amazing experience with UniFi, starting with Ubiquiti support when asking for recommendations on a build for my house to implementing that suggested equipment

                  My Build


                  Router: UniFi Security Gateway (USG)

                  Cloud Management: UniFi Cloud Key

                  Switch: UniFi Switch 16 150W (POE+)

                  APs: UniFi AP AC LR (POE) x 3
                   

                  My Build Out (Still needs some cleanup, but its getting there):


                  Note: I purchased all my equipment through Amazon because I'm a Prime member and they offer great discounts on this equipment

                  Let's get to Work!


                  I'd love to give ya'll a step by step guide on how to set this up at the house, but I truly can't and the reason why is because it is so damn easy!

                  I honestly would be insulting ya'll if I tried to instruct you on how to install the full stack.

                  The hardest part of the setup was running the physical cable from the Switch out to the APs and below is why that was a bit more difficult than I had expected. That is my kitchen after my Big Fella body fell thru it running my last strand of Cat6 in the attic.


                  It all turned out well and we were able to patch it and make it look brand new. All that being said, it was well worth even this because I love my UniFi setup!

                  Cool Features & Advantages (I've Found So Far...)


                  • User Dashboard in General
                    • This thing is just amazing & Beautiful! It provides the most info about my network that I have ever seen in any other product available to a Consumer
                  • Deep Packet Inspection (DPI)
                    • This will give you a very in depth look at each device and their inbound & outbound data

                  • Clients List
                    • Shows Clients on the network with a drill down to each network device and it's clients
                  • Coverage Map
                    • I know this isn't the most exciting feature in the world, but I though it was worth mentioning

                  MDS: Firware Upgrade

                  Task at Hand


                  Upgrade Cisco MDS (9706 specifically in my case)

                  Personal Blurb


                  I decided it was high time to upgrade our MDS 9706's to the Cisco recommended code, so I set out on the, at first glance, daunting task of upgrading our MDSes.

                  Prep (Very Important!)


                  Validate that each of your Hosts is Dual Legged so that if you need to reboot each side of the SAN that they will not lose connection to their storage.

                  Let's get to Work!


                  1. Download the Target Code from Cisco's website (This requires that you have a Cisco Account)
                  2. Use a TFTP Server to move the firmware over to the MDS Switches (I used tftpd)
                    • Location to Transfer to on the Switch: bootflash:
                    • Copy Commands
                      • copy tftp://<tftpd_server>/mdsfirmware/<Firmware_bin_file> bootflash:<firmware_bin_file>
                      • copy tftp://<tftpd server>/mdsfirmware/<firmware_bin_file> bootflash:<firmware_bin_file>
                  3. Save your current MDS config files off to a safe location (We use Solarwinds)
                  4. Install Firmware on Switch A
                    • Install Command
                      • install all kickstart bootflash:<firmware_bin_file_from_step_2> system bootflash:<firmware_bin_file_from_step_2>
                  5. Validate the Install was successful on Switch A
                    • show module
                      • This should show the new version was installed
                  6. Wait 30 Minutes (You could probably do a shorter time frame, but this is my safety net)
                  7. Repeat Steps 2 thru 5 on Switch B

                  References


                  Thursday, March 23, 2017

                  Cisco Networking Cheat Sheet

                  Task at Hand


                  Provide a comprehensive list of useful Cisco Networking commands. This list will continue to grow as I find more useful commands

                  Personal Blurb


                  This is my personal list of Cisco Networking based commands that I've found helpful throughout my my working inside that world

                  CLI Cheat Sheet (Mileage may vary depending on OS Version)


                  Display Commands
                  • Show Running Configuration for a specific Interface: sh run int eth<switch>/1/<port>
                  • Show vLANs on Switch: sh vlan | inc <VLAN Name>
                  • Find Device MAC based on IP Address:  sh ip arp <ip address>
                    • Switch has to have Layer 3 Enabled
                  Configuration Commands (Assuming you are in config terminal)
                  • Configure 1 Port: 
                    • Enter Config for the specific port: interface ethernet<switch id>/1/<port id>
                    • Change Specific Port Setting:
                      • Example
                        • Down the port: shut
                        • Up the Port: no shut
                        • Set the VLAN Access: switchport access vlan 300
                        • etc...
                  • Configure a Range of Ports (separated by "-"): interface ethernet<switch id>/1/<port id>-<port id>
                    • Example - interface ethernet101/1/1-10
                      • This will allow you to configure ports 1 thru 10 at once
                  • Configure a Group of Ports (separated by ","): interface ethernet<switch id>/1/<port id>,ethernet<switch id>/1/<port id>
                    • Example - interface ethernet101/1/1,3,5
                      • This will allow you to configure ports 1, 3, & 5 at once
                  • "Null Out" a Port: ip route <ip address> 255.255.255.255 null0
                    • This will shutdown the port's traffic without having to administratively shut it down

                  Thursday, March 16, 2017

                  Isilon: Re-IP a Subnet


                  Task at Hand


                  Re-IP a Subnet on an Isilon Cluster

                  Personal Blurb


                  I was recently handed a task to re-ip a subnet in one of our Isilon clusters, which at first glance I had a bit of a panic moment. After I had some time to cool down, I went about creating a task list of how I would go about this. As soon as I broke this task into the appropriate steps, it took some of the edge off of the project.

                  Let's get to Work!


                  1. Remove & Create A Record for the new SmartConnect IP
                    1. Log into the appropriate domain controller using your "Administrator" account
                    2. Open DNS Manager
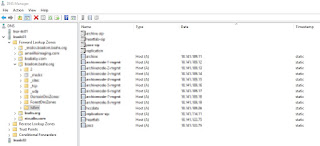
                    3. In the console tree, expand the appropriate domain's Forward Lookup Zones
                    4. In most cases, you will have a sub folder/domain named "Isilon". Expand the Isilon sub domain
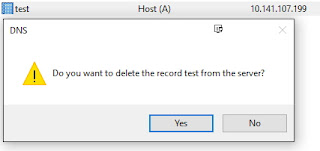
                    5. Remove Original A Record for the Old SmartConnect IP
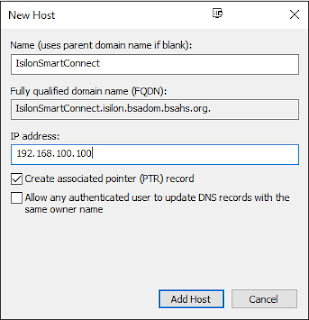
                    6. Create an A Record for the New SmartConnect IP

                  2. Adjust Delegation in DNS to point to the new SmartConnect IP

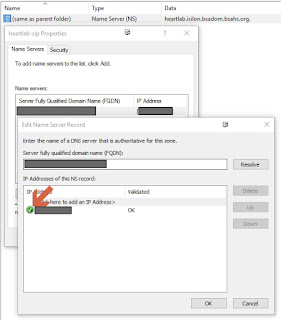
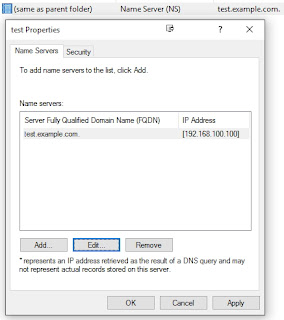
                    1. Open the properties on the respective delegation record
                    2. Adjust the "NS" Record to use the New Smartconnect IP

                  3. Delete Original Subnet

                    1. Connect to your Isilon Cluster Web GUI
                    2. Open up Cluster Management > Network Configuration
                    3. Select the appropriate Subnet
                    4. Select "Delete Subnet" link to the right of the subnet's name

                  4. Create Subnet

                    1. Connect to your Isilon Cluster Web GUI
                    2. Open up Cluster Management > Network Configuration
                    3. Select "Add subnet"
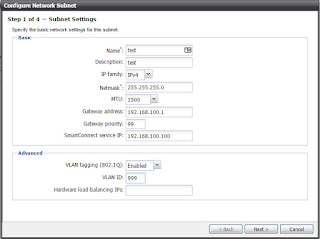
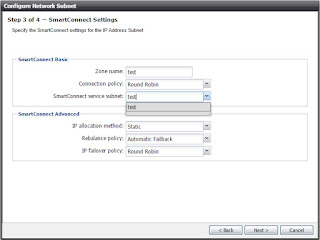
                    4. Fill out the Subnet Form 
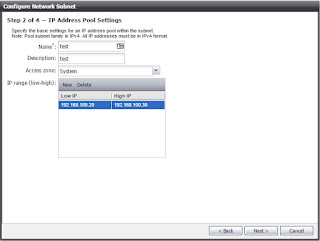
                    5. Fill out the IP Address Pool Form
                    6. Fill out the SmartConnect Settings Form
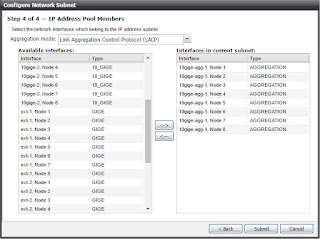
                    7. Select & Configure which Node Interfaces will be used by this Subnet
                    8. Hit Submit

                  5. Validate the subnets configuration looks good
                  6. Validate that the DNS Delegation NS Record shows to be connected
                  7.  You are now Up and Running on the new IP Scheme!

                  Side Note


                  I worked with an EMC Tech on this Playbook and he helped tweak a couple of points, but he gave his rubber stamp, which was really nice to have before I moved forward with the execution.

                  References


                  Monday, May 9, 2016

                  EMC World 2016: Biggest Takeaways

                  So Much...

                  There were so many announcements and so much excitement going on during EMC World last week that I just could not keep up with everything. So I decided to really hone in on a few of the products and do my bets to glean as much as I could during my time. Here is my take on a few of the products/announcements that happened during EMC World this year.

                  Unity (Mid-Range)

                  Web GUI built on HTML5 (Not Java!)! Enough Said!

                  That aside, This product family has some real promise because of its simplicity and scalability. With the price point starting at $10,000 (Mixed Storage) & $18,000 (All Flash) for 2 TB, this makes it a heavy contender in this space again. This will allow EMC to directly battle with companies like PureStorage again!

                  I'm going to say it just one more time... HTML5 built GUI

                  VCE VxRail/VxRack

                  The VxRail/VxRack Products are powerhouses that I think will be heavily utilized in the near future. Right now its a little too bleeding edge for most traditional enterprises to just pick up and run with it, but give it just a little while longer (1-3 years) in the market and let it prove its worth and I think this line-up will be an unstoppable force. They were already touting several huge contenders in the ring that have started digging into this market that are having huge success. 
                  I'm excited to see how this pans out and I'm hoping we dig in as well.


                  All-Flash Isilon (Nitro)

                  I had to mention this because it blew me away that this was a thing! Once the reasoning for this monstrosity was given (Mostly Video Rendering for the larger movie productions) it made a little more sense, but to the small fry like me and mine it just sounded too ridiculous to be real.


                  Useful Links/Info

                  Breakout Sessions Slide Decks

                  Tuesday, April 26, 2016

                  EMC World 2016: My Newbie Take - Summary

                  EMC World Aftermath

                  I quickly realized that at EMC World you better get ready to be overwhelmed! My Head was spinning so hard after the conference was completely over that I didn't know which way was up!

                  I was told before I went that I would have to "Choose Wisely" once I got there as to what I would give my attention to. Whether it be Breakout Sessions, vLabs, General Sessions, Mingling with the natives, or even the Expo. This didn't prepare me at all for what was to come.

                  As you can see, I was able to keep up with Day 1 of EMC World but I quickly was overwhelmed with all of the activities and events going on. I had to pick and choose carefully what breakout sessions fit our future needs the best, as well as juggle the vLabs as best as possible. All this while going to the keynotes and trying to socialize with everyone that I felt like I should.

                  All that being said, I enjoyed every minute of it and wouldn't take it back for anything. I appreciated everything byte of information I was able to download into my tiny brain and the full experience that came along with it.

                  I especially appreciate everything that our EMC Guys did for us during this trip down and all the hard work they put into helping us navigate through EMC World the best they could and knew how!

                  All in all, this was a great experience for me and I feel that having this knowledge and opportunity will help propel my career forward by leaps and bounds!